3D Printing Resources
3D printing is a manufacturing process where successive layers of material are laid down on top of each other in an additive process. Although 3D printing is often thought of as a new technology, it has actually been around for over 35 years. Patents related to 3D printing began to expire about 10 years ago and 3D printing opened up to mass audiences.
3D Printing Process
First, you need a 3D model, in the form of a .stl file. There are 3 ways to obtain one:
- Design a model using a computer-aided design (CAD) program like Tinkercad, Sketchup, or Fusion 360.
- Find a model online from repositories like Thingiverse or Printables.
- Scan an existing real-world object with a 3D scanner device.
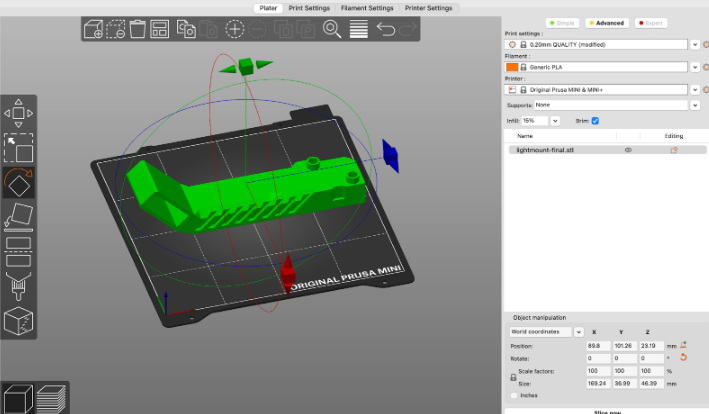
Your printer can’t read an STL file directly, so you first need to prepare the file using a slicer software:
- Excellent free, open-source slicers include Cura or Prusaslicer, which work with most 3D printers. Note: some brands, like Flashforge and Makerbot, require you to use their own proprietary slicer software.
- The slicer imports the STL file and “slices” your model into fine horizontal layers. From here, you also indicate print settings such as size, orientation, speed, quality, etc.
The output from the slicer is a G-code file of type .gcode. This contains instructions for the printer on how to move and lay down material to build your model one layer at a time from the bottom up.

Slicing Setting Checklist:
- Choose the correct 3D printer brand / model.
- Choose the correct filament type. (PLA, PETG, etc)
- Choose the layer height. (larger lines = faster print times, but lower quality)
- Size, scale, and orient your object correctly.
- Check for unsupported overhangs, and add supports as needed.
- Add any bed adhesion features, like a brim or raft.
- Choose your infill type and style. Less is more – only use what is needed!
- Slice the file and inspect it layer by layer, from the bottom up.
- Check the print time and filament usage and ensure you have enough material.
Download the G-Code! Depending on the printer, you may need to use USB, SD, MicroSD, or Wi-Fi to transfer G-code from your computer to your printer.
Once the .gcode file is loaded to the printer, you can select the file and run the print. But first, prepare the printer:*
- Clean the print surface with 90%+ isopropyl alcohol and a microfiber cloth.
- Heat up the nozzle and bed for the material you’re using (PLA: ~210° / 60°C; PETG: ~235 / 70)
- As needed, home the printer, check your z-offset, and level the bed.
- Load the filament you plan to use.
- Purge some filament to ensure flow of correct color.
- Load / select the g-code file.
- Start the print.
- Watch that first layer go down – it will determine the success of your print! If it doesn’t go down cleanly, don’t hesitate to cancel the print and make adjustments before trying again.
- Many printers let you adjust the z-offset while printing. This refers to the distance the nozzle is from the print surface. You’ll need to get it just right to get your material to adhere to the bed.
*Note: some printers automate several of these steps for you in the menu while others require you to do these steps completely manually.
First, you need a 3D model, in the form of a .stl file. There are 3 ways to obtain one:
- Design a model using a computer-aided design (CAD) program like Tinkercad, Sketchup, or Fusion 360.
- Find a model online from repositories like Thingiverse or Printables.
- Scan an existing real-world object with a 3D scanner device.
Your printer can’t read an STL file directly, so you first need to prepare the file using a slicer software:
- Excellent free, open-source slicers include Cura or Prusaslicer, which work with most 3D printers. Note: some brands, like Flashforge and Makerbot, require you to use their own proprietary slicer software.
- The slicer imports the STL file and “slices” your model into fine horizontal layers. From here, you also indicate print settings such as size, orientation, speed, quality, etc.
The output from the slicer is a G-code file of type .gcode. This contains instructions for the printer on how to move and lay down material to build your model one layer at a time from the bottom up.

Slicing Setting Checklist:
- Choose the correct 3D printer brand / model.
- Choose the correct filament type. (PLA, PETG, etc)
- Choose the layer height. (larger lines = faster print times, but lower quality)
- Size, scale, and orient your object correctly.
- Check for unsupported overhangs, and add supports as needed.
- Add any bed adhesion features, like a brim or raft.
- Choose your infill type and style. Less is more – only use what is needed!
- Slice the file and inspect it layer by layer, from the bottom up.
- Check the print time and filament usage and ensure you have enough material.
Download the G-Code! Depending on the printer, you may need to use USB, SD, MicroSD, or Wi-Fi to transfer G-code from your computer to your printer.
Once the .gcode file is loaded to the printer, you can select the file and run the print. But first, prepare the printer:*
- Clean the print surface with 90%+ isopropyl alcohol and a microfiber cloth.
- Heat up the nozzle and bed for the material you’re using (PLA: ~210° / 60°C; PETG: ~235 / 70)
- As needed, home the printer, check your z-offset, and level the bed.
- Load the filament you plan to use.
- Purge some filament to ensure flow of correct color.
- Load / select the g-code file.
- Start the print.
- Watch that first layer go down – it will determine the success of your print! If it doesn’t go down cleanly, don’t hesitate to cancel the print and make adjustments before trying again.
- Many printers let you adjust the z-offset while printing. This refers to the distance the nozzle is from the print surface. You’ll need to get it just right to get your material to adhere to the bed.
*Note: some printers automate several of these steps for you in the menu while others require you to do these steps completely manually.
Purchasing a 3D Printer
It is likely you will need multiple printers in order to meet the needs of full classes of students. Remember that print jobs can take anywhere from minutes to several hours. In the event a printer has a technical problem, you’ll be glad to have more that can keep running jobs. Budget with the right balance of quality and quantity of printers in mind.
Price does not necessarily equate to best quality and ease of use. There are several high-quality, user-friendly models for under $500 available. Larger printers and those with extra features like multicolor and expanded material options will cost in the $800-$1,500 range. Plan decisively for what kind of printing you’ll be doing. Often, multiple smaller printers with good quality and speed are more are a better purchase choice than a single higher-end printer with functionality you may not need regularly. Remember to leave room in your budget for filament, tools, storage, and extra parts.
When possible, gather information on the interface of the printer and the built-in functions it performs.
- Easy menu navigation, heated and removable bed, automation of bed-leveling and filament loading, and z-offset tuning during a print are must-haves for many 3D print enthusiasts, and they will save a lot of time and steps for teachers running multiple jobs a day.
- Determine if the printer requires proprietary software or filament, and weigh the pros and cons of this approach versus an open-source printer.
The level of support and response rates varies wildly between printer brands. Do your due diligence to determine which companies will stand behind their product and respond to your requests for help. Often, online communities of users can provide useful information. Remember that once your school is invested in this technology, someone will need to be in charge of troubleshooting, repairing, and being knowledgeable about them.
- Prusa
- Flashforge
- Lulzbot
- Anycubic
Some printers are built in box-like structures that fully enclose the moving parts when in operation.
Advantages:
- Protection from hot and moving parts;
- Maintain needed ambient temperature more consistently;
- Quieter and less smell from melting plastic;
- Can be easier to carry and fit into tight spaces.
Disadvantages:
- Students see less of the inner workings of the machine;
- More difficult to access internal parts for maintenance, repair, part replacement;
- Can be bulkier / heavier for transportation.
Additional Resources
The following is a list of prominent resources for those looking to develop 3D printing classes and 3D printing curricula.
- Tinkercad Tutorials & Starter Projects
- Project Ideas
- Periodic table, each student designs an element.
- City, each student designs a structure.
- Game board, each student designs a character.
- Mini-golf course, each group designs a hole.
- Thingiverse Education
- Dremel Digilab Education
- FlashForge 3D Printing Curriculum
- PolarCloud STEAMTrax Curriculum Kits
- ‘Learn by Layers’ 3D Printing Curriculum
- Tinkerine U Platform
- Makers Empire
- Makerbot Learning Collection
- Webinar: Explore a Thingiverse Education Project
- Kathy Schrock’s Guide to Everything
Check out this infographic to learn the basics of the 3D printing process and creating an educational 3D printing workspace, as well as activities you can use to integrate 3D printing into your core curriculum.
- Ensure clean easy movement of all axes without wobble. Adjust eccentric nut as needed on each axis.
- Clean bed surface (soap/water, IPA) every few prints minimum
- Purge filament, clean nozzle (as needed)
- Replace nozzle (as needed)
- Tighten screws on frame / gantry (yearly)
- Re-level bed, adjust Z-offset (if needed, otherwise check periodically)
- Hot end PTFE tube replacement (some models – as needed)
Related events, resources, and articles.

Joe develops and leads professional learning programs, trainings, and resources related to curricular integration, digital access, and technology infrastructure in southern Illinois.


